This article will review the HMIS function of Back Date Mode for HMIS project utilizing ClientPoint, or those only recording services. This article is not for use by ShelterPoint projects.
When to use Back Date Mode
When entering data into the HMIS system, it is always preferable to enter information on the same day as when the client enters the project or receives services from the project. While live or same day data entry is the ideal, the reality for most providers is that it is not always possible. Back Date Mode is a feature within HMIS to provide an accommodation for providers during those times when live or same day entry is not feasible - or when historical data needs corrected!
Example of appropriate uses for Back Date Mode:
- Pat Smith came to the emergency shelter on June 16th. Pat completed all required paperwork, however, all HMIS staff were gone for the evening. The following day when HMIS staff had returned, they were able to enter Pat's information into the HMIS system. Using Back Date Mode, the data being entered by HMIS staff on June 17th was able to be logged as entered on June 16th, when Pat actually entered the program.
- On August 1st, the shelter ran the ESG-CAPER report and discovered two of Pat Smith's intake answers were accidentally not recorded in HMIS. To correct, HMIS staff went to Pat's HMIS record, set the Back Date Mode to the project's start date for Pat, and corrected Pat's entry assessment for those two missing items. Setting the Back Date Mode allowed for the system to "stamp" the two data elements for the correct date of data entry.
Back Date Mode allows for data being manually entered today to appear within the system as a previous date. It essentially tells the computer to "pretend" it is a different date.
How to use Back Date Mode
Setting the date in Back Date Mode
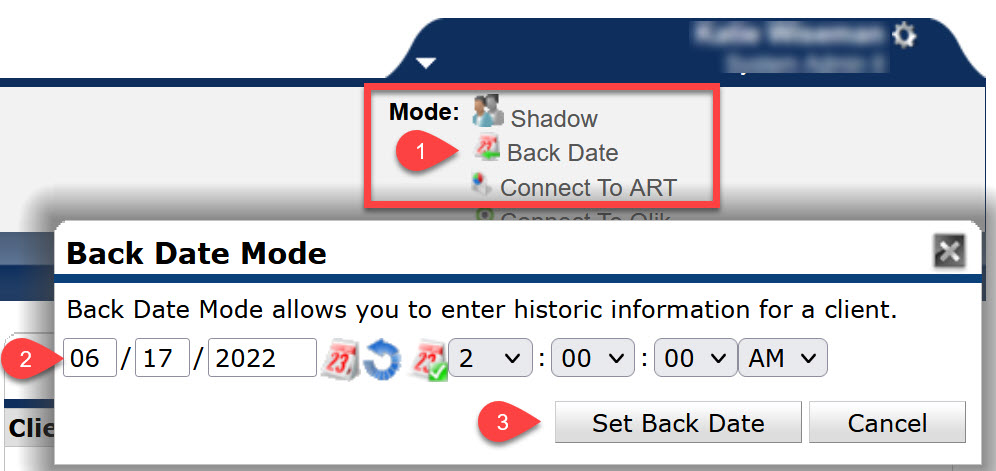
- Click on Back Date Mode from the upper right hand corner of the screen
- If entering a new client into HMIS or when putting a client into a project, Back Date Mode can be entered after searching for the client. The system will automatically display a pop-up box asking to set a Back Date Mode each time users enter a client record!
- Enter the date for which the data was actually collected
- When in Back Date Mode, leave the default time setting as 2am, for reporting purposes.
- Click Set Back Date
Back Date Mode Features
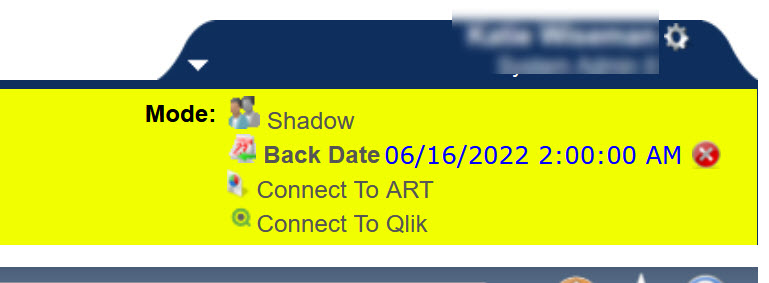
- When the Back Date Mode is active, the header bar of the screen will turn YELLOW and the historical date entered will appear to the right of the Back Date Mode icon in BLUE text.
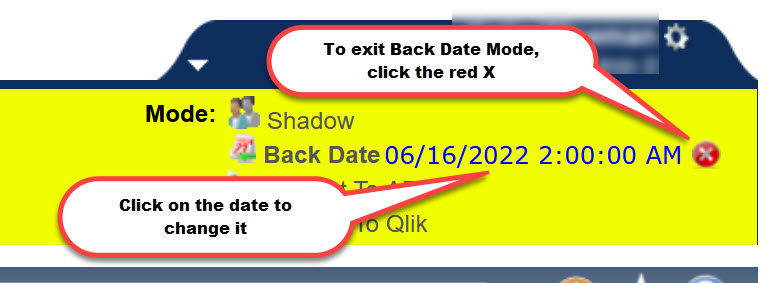
- To change the Back Date Mode to a different historical date, click on the blue date appearing next to the Back Date Mode icon.
- To exit out of Back Date Mode, click on the red circled X next to the date. The computer will then be in current, or real time, again.
Comments