This article is a step-by-step guide for navigating BusinessObjects Reports using the "View" method. BusinessObjects is available to HMIS users who also have a BusinessObjects license. To determine if you have access, check to see if you have "Connect to BusinessObjects" in the upper right hand corner of your dashboard screen - just below the Back Date Mode. All HMIS Agency Admins should have access!
The "View" function of BusinessObjects is useful when running a quick report, when trying to see what the report does, or when running reports that require the use of input controls.
Accessing a report
- BusinessObjects can be accessed two ways: (1) clicking on Connect to BusinessObjects located in the upper right-hand corner of the screen (below "Back Date Mode") or (2) by clicking the Reports tab from the main menu (on left-hand side of the screen) and then click on the BusinessObjects button
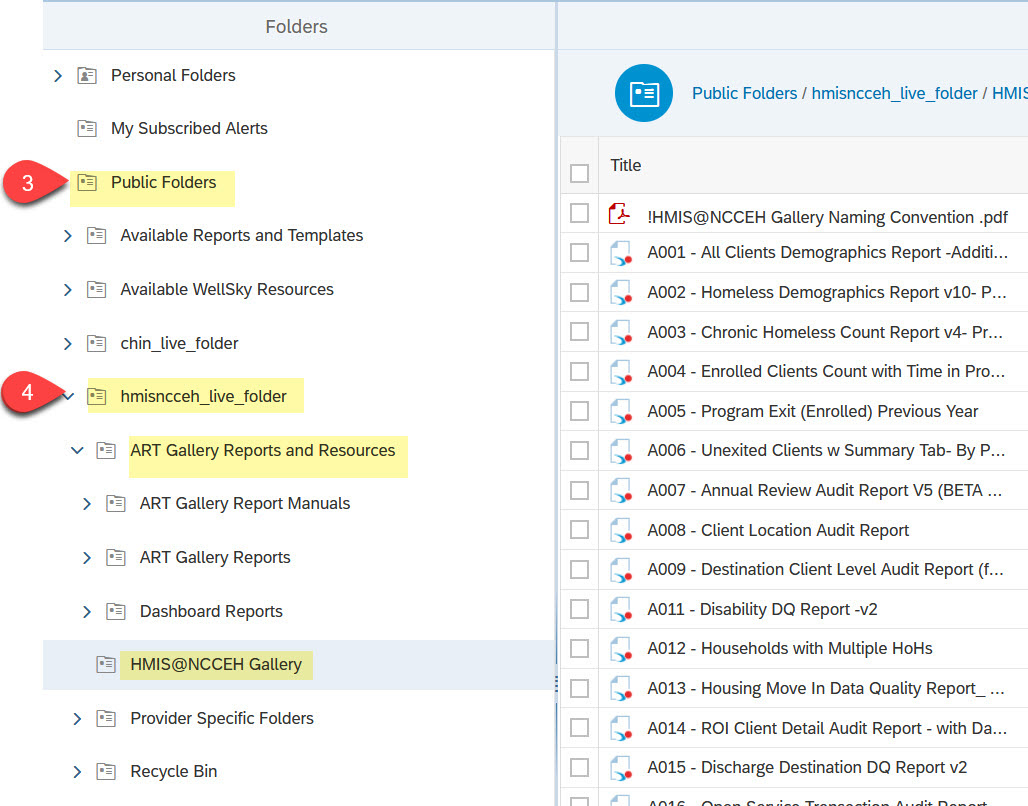
- Click the Folders button to navigate to a list of available reports
- Click Public Folders
- Click hmisncceh_live_folder
- Click ART Gallery Reports and Resources (for WellSky created reports, which all start with numbers - ex,. 0212, 0640, 0700) or HMIS@NCCEH Gallery (for NCCEH created reports, which all start with letters - ex. A007, D006)
- Click on ART Gallery Reports or HMIS@NCCEH Gallery to open the folder. All the reports will appear in a column to the right.
- Click on the name of the specific report needed

Navigating the selected report
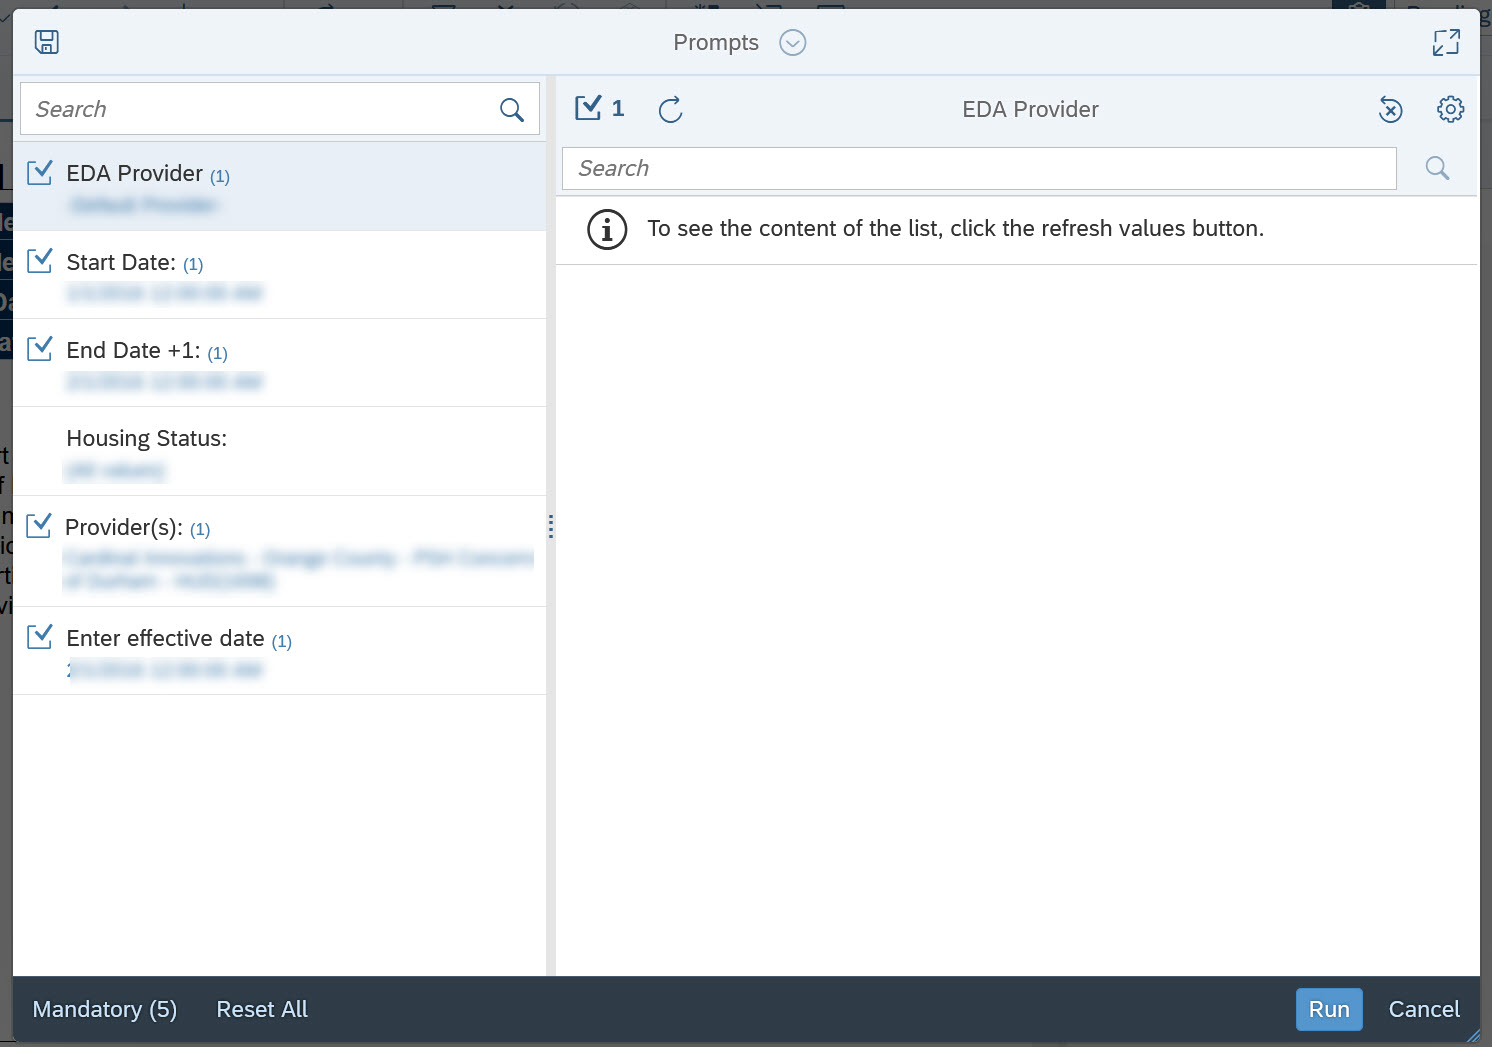
Once the desired report has been selected, the screen will refresh (this may take some time depending on the size of the report). The report is loaded when a prompt pop-up box appears. A list of prompts appear along the left side of the pop-up box. A selected prompt appears with a light blue hue. The highlighted prompt is the prompt actively open on the right hand side of the pop-up box, from where values for the active prompt can be selected.
Editing Prompts
Prompts are the perimeters set by you for which the database should pull and report out the data. Prompts that need to be completed will vary by report. In general, here are a few tips about prompts that apply to most reports.
Mandatory Prompts
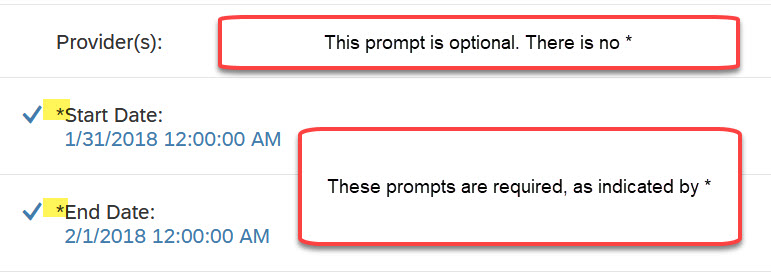
Most prompts in BusinessObjects reports are required, but there are some circumstances where you may see an optional prompt. If a prompt is required, the prompt will appear with * in front of the name:
If you only want to see the required prompts, click the Mandatory button in the lower left corner of the pop-up box. This will reduce the prompts on the screen to only those necessary to run the report.

Selecting Dates
All BusinessObjects reports that utilize a date range will have the date range separated out into two separate lines. One line will request the start date for the reporting range, and the other will ask for the end date. The terminology for the date prompts varies, and some common examples include, but are not limited to: "Enter Start Date", "Report Start Date", "Select Start Date", "Enter End Date PLUS 1 Day", Report End Date (Plus One)", and "Select End Date Plus One Day".
-
- If a date prompt is present, click the prompt, click on the Calendar Icon to select the date, and click OK. You can also enter the date manually in the text bar at the top.
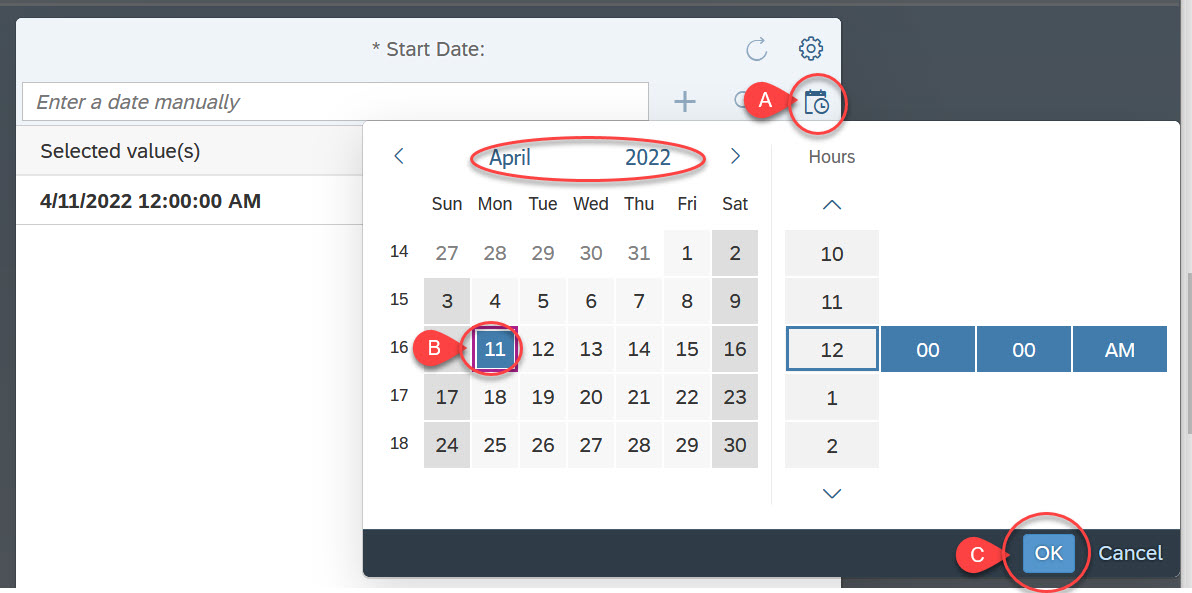
Start Date
The report start date should be the first day of the reporting period. The date must include the month, day, and year. Example: If the start of your reporting period is October 1, 2021, you should enter "10/01/2021" or "10/1/21".
End Date
End When entering an end date for the report, you must select or enter the day after the reporting period ends. Example: If the end of your reporting period is June 30, 2021, you should enter "07/01/2021" or "7/1/21".
Effective Date
Many BusinessObjects reports have a prompt that says "Enter effective date." If the report utilizes a start and end date, then the effective date you should enter will almost always match the same date you entered into the end date prompt. If, however, the report does not have a date range, the effective date will typically be the date you are running the report.
Selecting Providers, Reporting Groups, or CoCs
Most BusinessObjects reports will require the selection of one or more providers in order to run. In limited circumstances, the report may also allow for Continuum of Care or Reporting Groups to be selected. The wording of the prompt to select the providers for the report varies. Some common examples include: "EDA Provider", "Provider(s)", "Provider Group(s)", etc.
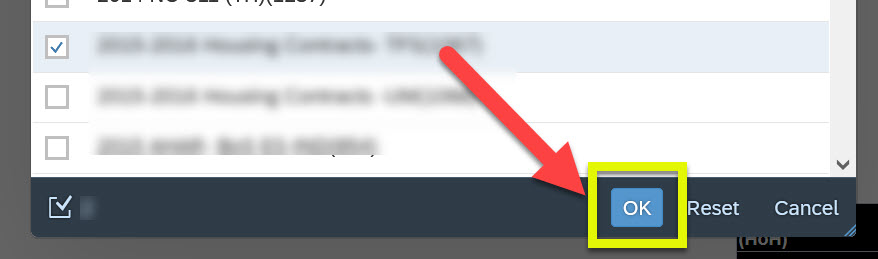
- For these types of prompts, click on the prompt, and click the refresh button. This will create a full list of available options from which to make a selection.
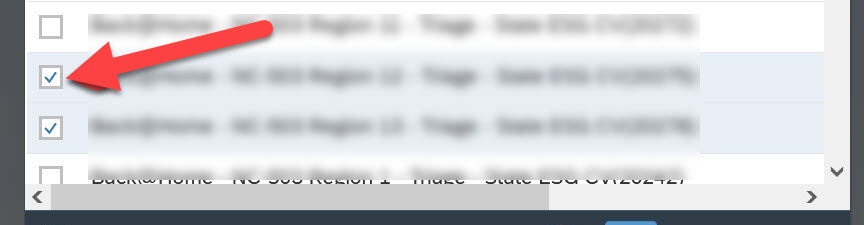
- Select the desired value(s) by clicking the checkbox(es) to the far left.
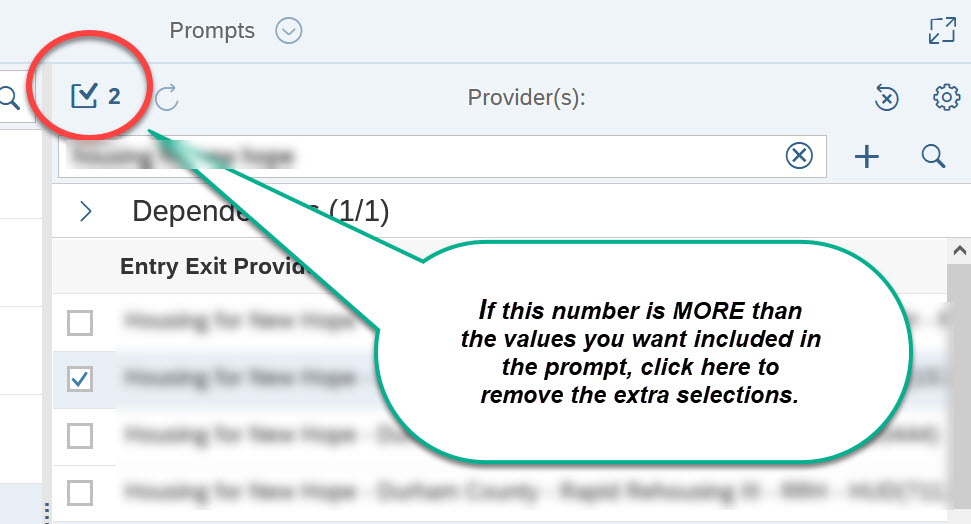
- Confirm that the number appearing on the square icon, in the bottom left of the pop-up box, matches the number of desired value(s) selected. If the number is greater than the number of desired value(s), there are pre-populated selections that need to be removed. To remove those extra selections:
-
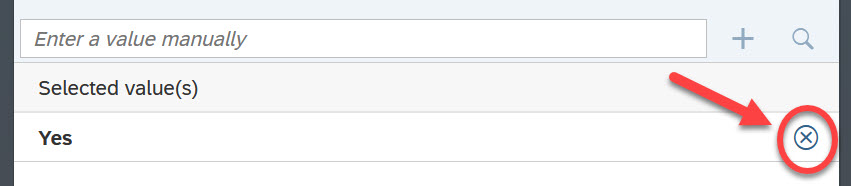
- Click on the square icon
- Click the X next to the selected prompt which should be excluded from the report
- Once all pre-populated selections have been removed, click OK
- Click on the square icon
-
- Once only the desired value(s) appear on the list, click OK.

EDA provider prompt tip: keep the EDA provider to "Default" if running the report for multiple providers, as a reporting groups, or as a CoC. If the report is for only one provider/project, select the EDA provider to match the Provider prompt.
Reviewing the report
Once all prompts are complete, click Run for the report to load with the specific details requested. The image below breaks down features to navigate the loaded report.
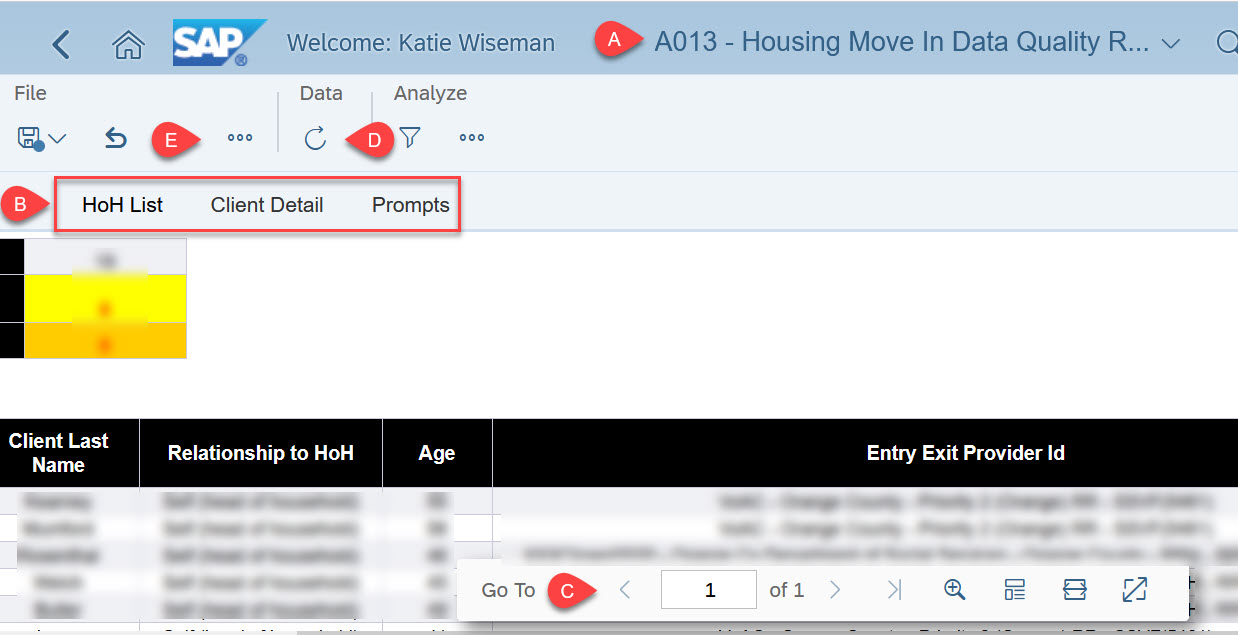
*FOR A LARGER IMAGE, CLICK ON THE "SAP VIEW SCREEN.JPG" FILE ATTACHED AT THE BOTTOM OF THIS ARTICLE*
A. Header: Name of the report selected
B. Report tabs: to navigate between each tab, click on the tab name to view the data within it
C. Page: this bar indicates how many pages of data are available within the tab; click the arrows to move between the pages. Click the magnifying glass to zoom in and enlarge the report details on screen
D. Refresh: click the refresh button to change the prompt details for the report
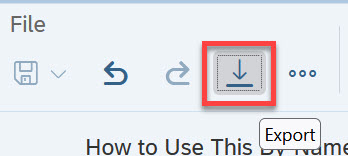
E. Additional Options : click the additional option (shown as " ...") to print the report or the additional option (shown as a down arrow with an underline) to download the report.
Using Input Controls
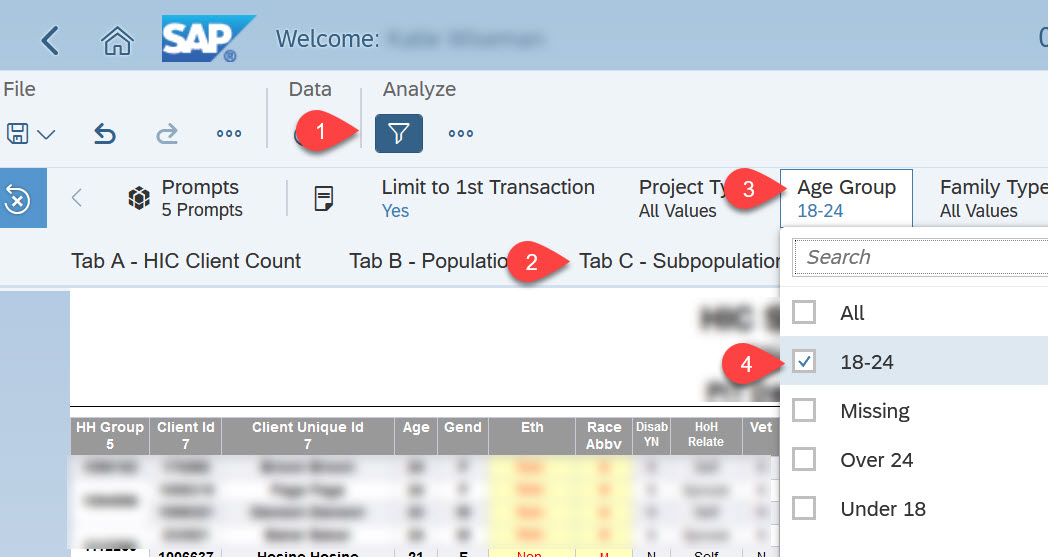
Some BusinessObjects reports have the additional function of "Input Controls". Input controls add a layer of filtering within the report for specific prompts.
Accessing Input Controls
Once a report has loaded with the prompts indicated, Input Controls can be located along the upper tool bar on the report. Click on the Filter icon. The available input controls within the specific tab of the report will populate just below the filter icon and above the tabs icon. If nothing populates, there are no input controls for that specific tab.

The image below is an example of a report with Input Controls within a tab.
-
-
-
- Click the Filter icon
- Click the desired tab
- Click the desired input control filter
- Select the filtered data to be included/excluded on the report
- Click Ok to apply the input control filtered data
-
-
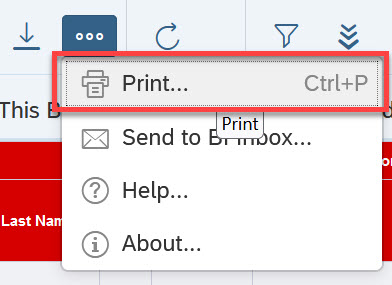
Printing or Exporting Reports
To print a report from View mode, click the additional option feature (shown as " ..." ). Select Print.
To export a report from View mode, click the additional option feature (shown as an underlined down arrow).
If Export is selected, the (a) format and (b) content must be selected. (DO NOT SWITCH FROM CONTENT "REPORTS"! - highlighted below)
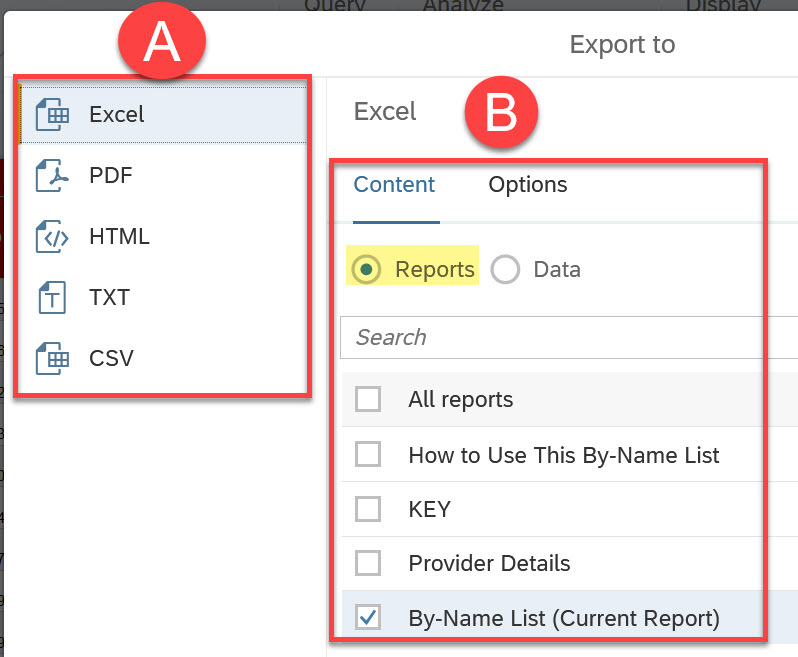
- Format option Excel (or CSV) is suggested for reports which users intend to sort, filter, or edit the content. Data quality reports or By-Name-Lists are common reports for which Excel might be ideal. *** Do not switch the content option from reports to data! This will cause errors!
- Format option PDF is suggested for reports which are submitted as "final" and will not be sorted, filtered, or edited. Billing reports are common reports for which PDF would be ideal.
A cool new feature of BusinessObjects is the ability to select the content to export (show in image above as "B"). The feature allows for customization of which tabs should or should not be exported. Click the checkbox(es) next to the tab(s) to be exported. This is especially helpful if you only want to share summary tabs and not all the client details found on another tab!
REMINDER: When downloading or printing reports containing Personally Identifying Information (PII), extra security precautions should be taken. Be sure to delete downloaded files from your computer when they are no longer needed. Be sure to remove PII (names, date of birth, etc) before emailing or sharing the report with others!
ARE YOU LOOKING FOR MORE RESOURCES? BELOW ARE SOME SUGGESTED RELATED ARTICLES!
How to Schedule BusinessObjects Reports
Comments